Change data in static widgets on all pages
SHARE
The Kentico Portal Engine has many methods for building content. One of the methods is to build website content based on widgets. Kentico's Portal Engine widgets represent reusable components that can easily be manipulated by content editors and other non-technical users. Widgets and the Kentico page builder feature give non-technical users more power and flexibility when adjusting page content. By working with widgets, users can decide which components are placed on pages and where. In this case you don't need to have a lot of page templates you can always use widgets to customize your page.
Problem
But with this approach we can also have some issues. Take the example of a static HTML-based widget used on many pages of our website. It is a banner with text and images in the background. This content is implemented by adding HTML / CSS markup to the widget field displayed on the page.
After a while, we may need to change the contents of this widget. To do this, we will go to the Widgets application and change the field in the settings. After that, we will see that the content of this widget hasn't changed on the pages, and changes are applied only when it is recreated. This is because changes to the database are only updated in the table - CMS_Widget, and no changes are made to the pages, where the widget copies are actually located. Unfortunately, Kentico doesn’t provide the ability to update all copies of the widget posted on the pages. Because of this, we need to manually recreate it on every page. Usually there are so many pages and it can take a lot of time and effort.
To solve this problem, we need to understand how widgets are stored on pages in the database. All information about the page is stored in the CMS_Document table, we are interested in only two columns of this table: DocumentWebParts and DocumentContent. Widgets created on the basis of static web parts and in the editor zone are stored in the DocumentWebParts column and are located by: page-> webpartzone-> webpart. Widget content created as an inline widget is only stored in the DocumentContent column and is located by: content-> webpart ->! CDATA [...]. Non-static widgets inside the editor zone are also stored in DocumentContent via: content-> webpart ->! CDATA [...], although their contents are also duplicated in the DocumentWebParts column.
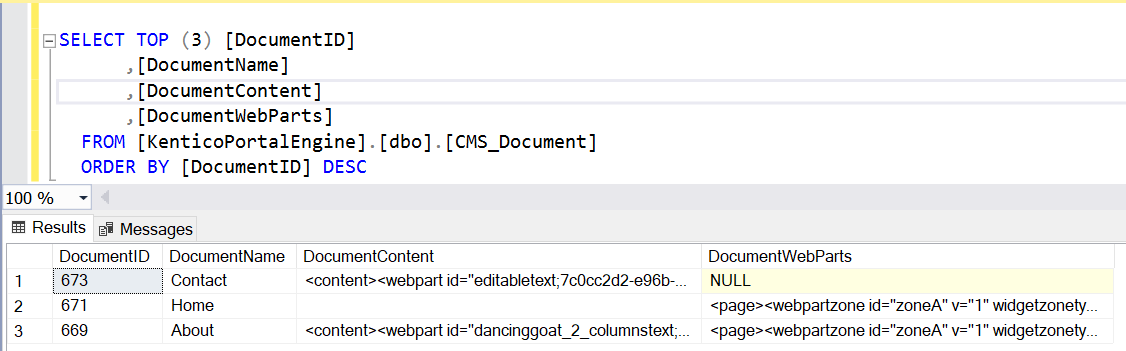
In the screenshot above, we can see three pages: Contact, Home and About. In the Contact page we have an inline widget inside the web zone. The Home page has a static HTML widget inside the Editor zone. And the last page inside the Editor zone has a non-static widget that can be edited directly on the page.
As you can see, different widgets are stored differently in the Kentico database. The following is a software solution for the problem described above.
Solution
Let's create a module that will allow us to update the content of static widgets on all pages. To begin with, we will create a custom module in the Kentico administration panel, in which we will be able to select the widget and its field that needs updating. To do this, we will create a custom module based on a simple web form.
Step 1
In our web form, we will create an UI containing a drop-down list of all available widgets and a hidden RadioButtonList that will display all the fields of the selected widget.
<asp:Content runat="server" ContentPlaceHolderID="plcContent" ID="plcLeadsUpload">
   <div class="cms-bootstrap">
    <asp:ScriptManager ID="manScript" runat="server" ScriptMode="Release" EnableViewState="false" />
    <br />
    <div class="row">
        <div class="col-lg-2">
            <asp:Label runat="server" CssClass="control-label text-right">Widget Name:</asp:Label>
        </div>
        <div class="col-lg-3">
            <asp:DropDownList runat="server" CssClass="DropDownList form-control" ID="dropDownList"   />
        </div>
        <div class="col-lg-1">
            <asp:Button runat="server" ID="btnCommit" CssClass="btn btn-default" Text="Get properties" OnClick="btnCommit_Click" />
        </div>
    </div>
    <br />
    <div class="row">
        <div class="col-lg-2">
            <asp:Label runat="server" CssClass="control-label text-right" Visible="false" ID="propLabel">Properties to update:</asp:Label>
        </div>
        <div class="col-lg-3">
            <asp:RadioButtonList ID="cblOverwrite" runat="server" CssClass="radio"></asp:RadioButtonList>
        </div>
    </div>
    <br />
    <div class="row">
        <div class="col-lg-1 col-lg-offset-2">
            <asp:Button runat="server" CssClass="btn btn-primary" Visible="false" ID="btnUpdate" Text="Update" OnClick="btnUpdate_Click"/>
        </div>
    </div>
    </div>
</asp:Content>
Step 2
The user interface is ready, now let's add some logic. When page loading, we need to get a list of our widgets and add it to the drop-down list.
protected void Page_Load(object sender, EventArgs e)
{
    CssRegistration.RegisterBootstrap(Page);
	ScriptHelper.RegisterBootstrapScripts(Page);

	if (dropDownList.Items.Count == 0)
	{
	    var widgets = WidgetInfoProvider.GetWidgets();
	    var widgetsList = widgets.Select(item => new ListItem(item.WidgetDisplayName, item.WidgetName))
	                             .OrderBy(item => item.Text);
	    dropDownList.Items.AddRange(widgetsList.ToArray());
	 }
}
Step 3
After selecting a widget, we need to display all its fields. To do this, we will find the selected widget in the system and add to RadioButtonList all its fields that have the ability to specify text content.
private static WidgetForm form;
protected void btnCommit_Click(object sender, EventArgs e)
{
	var serializer = new XmlSerializer(typeof(WidgetForm));
	WidgetInfo widget = WidgetInfoProvider.GetWidgetInfo(dropDownList.SelectedValue);

	using (var stringReader = new StringReader(widget.WidgetProperties))
	{
	    form = serializer.Deserialize(stringReader) as WidgetForm;
	    form.WidgetName = widget.WidgetName;
	    var formfields = form.fields.Where(field => field.properties != null)
	                                .Select(it => new ListItem(it.column));
	    cblOverwrite.Items.Clear();
	    cblOverwrite.Items.AddRange(formfields.ToArray());
	}

	propLabel.Visible = true;
	btnUpdate.Visible = true;
	updatesNumber.Visible = false;
	updatesLabel.Visible = false;
}
The basic UI and logic are ready, now we need to search the widgets and change the content of their fields in the database. All page information is stored in the CMS_Document table, and the contents of the page are stored in xml format inside the DocumentWebParts column of that table. To update the content of the selected widget, we need to search every element in every xml file on all pages by: page-> webpartzone-> webpart [type == widgetName] -> property [name == selectedPropName], where webpart is all page elements (including widgets), property are all fields of the selected widget. When we find the widget and its field, we need to update the Value property of this field. Enough of the theory, it's time to start practicing.
Step 4
First, let's create a class. It will represent our CMS_Document table, each instance of which will contain the values of the columns we need: DocumentID and DocumentWebParts. The isChanged field indicates if any changes have occurred to this instance.
public class CMS_Document
{
    public int DocumentID { get; set; }
    public string DocumentWebParts { get; set; }

    public bool isChanged = false;

    public CMS_Document(int documentId, string documentWebParts)
    {
        DocumentID = documentId;
        DocumentWebParts = documentWebParts;
    }
}
Step 5
Now let's create a static class with two static methods. The first method will select the data from the database and return the CMS_Document class collection, the second will update the data in the database if the isChanged field is true;
public static class Document
{
        private static string connectionString = ConfigurationManager.ConnectionStrings["CMSConnectionString"].ConnectionString;
	public static List<CMS_Document> GetDocumentTable()
	{
	    string selectQuery = "SELECT DocumentID, DocumentWebParts FROM CMS_Document";

	    using (SqlConnection connection = new SqlConnection(connectionString))
	    {
	        connection.Open();
	        SqlCommand command = new SqlCommand(selectQuery, connection);
	        SqlDataReader reader = command.ExecuteReader();

	        if (reader.HasRows)
	        {
	            var CMS_DocumentTable = new List<CMS_Document>();
	            while (reader.Read())
	            {
	                int documentId = Convert.ToInt32(reader.GetValue(0));
	                string documentWebParts = reader.GetValue(1).ToString();

	                if (!string.IsNullOrEmpty(documentWebParts))
	                {
	                    var tableRow = new CMS_Document(documentId, documentWebParts);
	                    CMS_DocumentTable.Add(tableRow);
	                }
	            }
	            return CMS_DocumentTable;
	        }
	        reader.Close();
	    }
	    return null;
	}

	public static void UpdateDocumentTable(CMS_Document document)
	{
	    if(document == null || !document.isChanged)
	    {
	        return;
	    }

	    string updateQuery = $"UPDATE CMS_Document SET DocumentWebParts=@WebParts WHERE DocumentID=@Id";

	    using (SqlConnection connection = new SqlConnection(connectionString))
	    {
	        connection.Open();
	        SqlCommand command = new SqlCommand(updateQuery, connection);
	        command.Parameters.Add(new SqlParameter("WebParts", document.DocumentWebParts));
	        command.Parameters.Add(new SqlParameter("Id", document.DocumentID));
	        command.ExecuteNonQuery();
	    }
	}
}
Step 6
And finally, we implement logic of finding the selected widget in the xml string and changing the value of its field. To do this, we implement the SetWebParts method in the CMS_Document class, which will receive the name of the selected widget, its field and new content.
public void SetWebParts(string widgetCodeName, string newData, string propName)
{
	if (string.IsNullOrEmpty(DocumentWebParts))
	{
	    return;
	}

	XDocument xmlContent = XDocument.Parse(DocumentWebParts);
	XElement page = xmlContent.Element("page");
	IEnumerable<XElement> webpartzones = page.Elements("webpartzone");

	foreach (var webpartzone in webpartzones)
	{
	    IEnumerable<XElement> webparts = webpartzone.Elements("webpart");

	    foreach (XElement webpart in webparts)
	    {
	        if (webpart.Attribute("type").Value == widgetCodeName)
	        {
	            var properties = webpart.Elements("property");

	            properties.Where(prop => prop.Attribute("name").Value == propName).ToList()
	                      .ForEach(item => item.Value = newData);

	            isChanged = true;
	        }
	     }
	 }
	 DocumentWebParts = xmlContent.ToString();
}
Step 7
Everything is almost ready, all that remains is to use it in our web form. We implement the processing of the last button click event. Here, we apply two previously implemented classes to select, set and update the contents of widgets on pages.
        protected void btnUpdate_Click(object sender, EventArgs e)
        {
            string selectedListItem = cblOverwrite.SelectedValue;
            if (string.IsNullOrEmpty(selectedListItem))
            {
                return;
            }

            var widget = form.fields.First(f => f.column == selectedListItem);
            var newData = widget.properties.First().defaultvalue;

            if(newData != null)
            {
                var CMS_DocumentTable = Document.GetDocumentTable();
                CMS_DocumentTable.ForEach(page => page.SetWebParts(form.WidgetName, newData, selectedListItem.ToLower()));
                CMS_DocumentTable.ForEach(page => Document.UpdateDocumentTable(page));
            }
        }
Conclusion
Now, we have our own simple module. Where we can update the content of static widgets on all pages of our website in just 4 clicks!
Author
Roman Hutnyk
Check other articles


Budgeting and Quote tools Automation solutions for your company

Inventory management: automation and best inventory practices

20+ reasons to move to Kentico MVC

Bits Orchestra has nominated as one of the best software development companies in Europe

Kentico .NET Core Migration
What our clients say

What our clients say

What our clients say

What our clients say

What our clients say
